Strawberries and Ice Cream

Although I wait in great anticipation for the new arrival of fresh spring fruit every year, I’m nevertheless always mildly surprised when it actually shows up. It’s a little bit like seeing a good friend for the first time after miles and months apart. Today, all of a sudden there are these beautiful precious things, a bright shock of color after the dreary days of winter.

Strawberries are making their first appearance here in California and they are looking great. Their bright color and wonderful aroma send such a strong signal of the coming spring season, it’s impossible not to jump and make a first purchase.

This ice cream is a great way to enjoy some terrific juicy strawberries. They are sweetened and enhanced with a bit of balsamic vinegar and then folded into a tart ice cream base to produce a grand pleasure reminiscent of a simple bowl of strawberries and cream. I think you’ll find this a very enjoyable way to welcome a new crop of gorgeous and glorious fruit. Spring has definitely sprung!

Bench notes:
- Taste your strawberries to gauge their sugar level and then keep tasting as you add sugar.
- Substitute brown sugar in the strawberries if you prefer.
- Since strawberries contain quite a lot of water, if you won't be consuming all the ice cream at once, the strawberries will need quite a lot of sugar and should be pureed to avoid becoming too icy in the freezer.
- If you enjoy balsamic vinegar, you'll love the reserved syrup generously spooned over a bowl of the ice cream. After you've strained out the strawberries, taste for any additional sugar or balsamic.

Strawberries and Cream Ice Cream
Makes about a pint

1 C sour cream
1/2 C buttermilk
1/4 C heavy cream
1/4 C milk
1/2 C sugar
pinch of salt
1/2 t lemon juice

1 pint of fresh ripe strawberries
3 T sugar, to taste
balsamic vinegar, to taste

Whisk all the dairy ingredients together until blended. Add the sugar, pinch of salt and the lemon juice. Chill thoroughly.

Hull and cut strawberries into thin slices and place in a bowl. Toss with sugar and taste for sweetness. Add balsamic vinegar a teaspoon at a time, to taste. Set aside and let macerate for about an hour.

Freeze the ice cream according to your machine’s instructions. Pour into a clean airtight container. Put a piece of plastic wrap on the surface, cover and place in your freezer for an hour or two to firm up a bit.

Drain strawberries in a strainer and reserve the syrup.

When the ice cream is ready, pour about half of it into another container and dollop with strawberry mixture. Repeat and press the strawberries into the surface. Scoop into ice cream dishes and enjoy with a drizzle of strawberry balsamic syrup.

Fruits of Summer Ice Cream Sundae

Sitting out on picnic table in the sunshine, eating ice cream after running through the sprinkler.  This was an important part of summer to me when I was a kid.  I loved any kind of ice cream...peppermint bon bon, sherberts, cookie dough, strawberry, peach, chocolate...I ate them all!  I would even scoop them all into one bowl if I had the option to!  I loved to load them up with toppings as well.  I can remember being at my Dad's house when I was about eight making myself an ice cream sundae.  I grabbed everything and anything ice cream related or that could be used as a topping and started crafting my masterpiece.  I scooped 3 different ice creams into a bowl.  Peppermint Bon Bon, Strawberry, and Moose Tracks. I then loaded it up with fudge, caramel and reddi whip.  Not to stop there however, I topped it off with M&Ms and chocolate chips. It was a monster bowl of ice cream, and I ate it all!  Looking back on it, it sounds way too sweet and kind of disgusting to me now, but I was in heaven at the time!

My tastes have drastically changed and I am no longer into that overly sweet stuff.  I much prefer things which are made sweet by fruit instead of just sugar, and I am in love with coconut milk based ice creams instead of the dairy I used to indulge in all the time.  And so recently when I was looking through photos of the ice cream on my blog, I thought, wouldn't it be lovely to create a sundae featuring fruit and herbs?
I had recently made lemon basil ice cream and it was so refreshing that I knew it would be perfect among the other ice creams in the sundae.  I also whipped up a batch of raspberry lavender and peach thyme.  They were all wonderfully fragrant and just sweet enough, but not overly so.

I spooned them into one of my Grandmother's antique dishes, and topped them off with a bit of fresh raspberry sauce, crunchy pistachios, and a mixture of fruits I happened to have on hand.

It was the most beautiful sundae I had ever layed eyes on...almost too pretty to eat!  You may be wondering if I ate this concoction myself or shared, as it was a rather large bowl.  I ate every last bite myself!  It was too good to share...that bowl at least.

Luckilly I had enough ice cream leftover to share some.  Who says ice cream sundaes have to be overly sweet and dripping with gooey sauces?  Light and refreshing is so wonderful especially when it is near 100 degrees and you don't want to be feeling heavy.

Fruits of Summer Ice Cream Sundae
peach thyme ice cream:
makes 5 cups

2 Tbsp fresh thyme
3 cups organic full fat coconut milk, chilled
3/4 cup agave nectar
2 medium fresh organic peaches, diced
1 Tbsp pure vanilla extract
1/4 tsp sea salt

In a blender combine all ingredients, and process until well blended. Pour the mixture into an ice cream maker and process according to package directions (mine takes about an hour, and is still a little soupy like the consistency of a malt, but firms up in the freezer later). Once processed, pour into a freezable container with a lid, and place in the freezer for at least 8 hours, or overnight to firm up for best results.

raspberry lavender ice cream:
Makes 5 cups
1 cup full fat coconut milk
2 Tbsp dried lavender, divided
2 cups organic full fat coconut milk, chilled
3/4 cup agave nectar
12 oz fresh organic raspberries or 12 oz bag frozen raspberries
1 Tbsp pure vanilla extract
1/4 tsp sea salt

In a small saucepan, bring 1 cup lite coconut milk to a simmer and remove from heat. Add 1 Tbsp dried lavender flowers and stir in. Let cool, then chill in the fridge until very cold to let lavender infuse. Strain coconut milk, discarding lavender then add chilled milk to a blender, along with all other ingredients (except remaining 1 Tbsp dried lavender) in a blender, and process until well blended. Pour the mixture into an ice cream maker and process according to package directions (mine takes about an hour, and is still a little soupy like the consistency of a malt, but firms up in the freezer later). Once processed, stir in remaining Tbsp lavender and pour into a freezable container with a lid, and place in the freezer for at least 8 hours, or overnight to firm up for best results.

lemon basil ice cream:
Makes 4 cups

3 cups organic full fat coconut milk, chilled
1/4 cup fresh basil leaves, packed
3 Tbsp organic lemon zest
3 Tbsp lemon juice
3/4 cup agave nectar
1 Tbsp pure vanilla extract
2 tsp lemon extract
1/2 tsp sea salt

Combine all ingredients in a blender, and process until well blended. Pour the mixture into an ice cream maker and process according to package directions (mine takes about an hour, and is still a little soupy like the consistency of a malt, but firms up in the freezer later). Once processed, pour into freezable container with a lid, and place in the freezer for at least a few hours, or overnight to firm up for best results.

Raspberry Sauce:

2 cups fresh raspberries
2 Tbsp agave nectar
2 tsp pure vanilla extract

Puree all ingredients until smooth.

For assembly:
1/4 cup pistachios (each sundae)
assorted fresh organic fruit (I used raspberries, blackberries, peaches, and strawberries)
fresh basil and thyme leaves

To assemble, scoop 2 scoops of each ice cream into an obling bowl.  Top with a bit of raspberry puree, pistachios, fresh fruit, and herbs.  Enjoy!

Coffee Ice Cream - The Ultimate Summer Treat

Coffee ice cream has to be one of the most refreshing summer treats available. This tasty, frozen dessert combines the refreshing coolness of ice cream with the tantalizing flavor of coffee. Factor in a little energy boost from the coffee...and you've got yourself a super summer treat!

Thinking that frozen coffee treats are just reserved for specialty shops and that only gourmet chefs can churn out this fantastic treat, it's a wonderful surprise to taste the product of this recipe for the first time! Yup! You can make this great tasting dessert in the comfort of your own home!

Whether you're heading out to cut the grass, you've just come in from weeding the garden, or you just want a chilled bowl full of frozen goodness...you'll be happy to relax with the tasty treat made from this simple recipe. You'll be surprised that you made it yourself!

This recipe is versatile. You can make it to suit your "coffee tastes and preferences." Some people like their coffee weak; others will only drink it strong. Some people are adamant regular flavored coffee drinkers; others love the variety of flavored coffee now and then. Some people choose espresso over coffee.

When it comes to this recipe, you can adjust it to suit your likes and churn out a treat that's perfect for you!

Do you like your coffee strong or weak? Use more or less coffee to suit your preference!

Are you in the mood for flavored coffee? Simply use your favorite flavored instant coffee!

Do you like coffee or espresso better? Use your favorite instant coffee or espresso!

Ingredients

1 cup milk
1/2 cup granulated sugar
3 tbsp instant coffee or espresso (2 tbsp for a weaker flavor, 2 1/2 tbsp for a moderate coffee flavor)
2 cups heavy cream
1 tsp vanilla extract

Directions for Making Homemade Coffee Ice Cream

Step 1: With an electric mixer or whisk, mix milk, granulated sugar, and instant coffee until the sugar and coffee have completely dissolved.

Step 2: Stir heavy cream and vanilla extract into the coffee mixture.

Step 3: Pour mixture into your ice cream maker.

Step 4: Mix ingredients in your ice cream maker according to the manufacturer's directions. Ice cream will be thick when finished.

Step 5: Dig in and enjoy!

With your bowl filled to overflowing with this tasty bowl of homemade coffee ice cream, you can sit back...relax...and enjoy the beautiful day!

How to Make Homemade Coconut Ice Cream

There is something about the taste of coconut that reminds me of being on holiday. I love being on holiday, the feeling of sand between my toes, the sound of the waves ebbing and flowing as I sleep with the sun on my face. Now I have to confess, this recipe for coconut ice cream is no substitute for being on holiday, but it brings back so many happy memories it would be very remiss of me not to indulge myself occasionally.

If the taste of coconut reminds you of holiday why not try my very simple recipe for coconut ice cream. I eat it plain, but a friend of mine who is a self confessed chocoholic eats hers with a drizzle of hot chocolate sauce.

Recipe for Coconut Ice Cream

375ml Double Cream
225ml Full Fat Milk
175g Grated Coconut
75g Sugar
4 Large Egg Yolks
50ml Coconut Milk

Grate the coconut and place in a saucepan with the cream and the milk. Heat over a medium heat until the liquid is almost at boiling point. You will know when it has reached the right temperature as small bubbles will be forming around the edge of the pan. Take off the heat and leave to cool for thirty to sixty minutes so the liquid absorbs the flavour of the coconut.

Place the egg yolks in a bowl and mix in the sugar until you have a creamy paste. Add the coconut milk to this paste and stir well.

Strain the cream and milk mixture so that you have taken out all the pieces of coconut. Place the coconut to one side as you will be using some of this later. Reheat the liquid until it is almost at boiling point again.

Add the egg yolks, sugar and coconut milk and heat over a low heat until the mixture has thickened and coats the back of a wooden spoon.

Leave to cool for three to four hours and then place in your ice cream maker, churning as per your manufacturer's instructions. With five minutes to go before the end of the process add a handful or two of the coconut pieces to the ice cream. Freeze in your freezer for no longer than one week.

How to Make a Quick and Easy Ice Cream Cake

Ice Cream cake is a fun and delicious way to end a meal or to celebrate a special occasion. I find that the store bought version is boring, tasteless and quite expensive.

So for my daughter's birthday we came up with own unique customized ice cream cake. We used all of her favorite ice creams, cookies, gel decorations and candy to get exactly what she wanted. We also had a terrific time talking about the type of cake, the number of layers and which flavors would taste best together.

The first thing to do is to line a pan with a piece of wax paper or parchment paper and allow the paper to hang over the sides. Also, at this time, remember to take the ice cream out of the freezer so it can soften.

In a large bowl, beat 1 1/2 cups of heavy cream and 2 tablespoons of confectioner sugar until stiff peaks form. Spread a layer of whipped cream in the bottom of the pan and put the pan in the freezer for a few minutes. Place cookies in a bag and crush with a rolling pin and then spread a portion of the cookies on top of the whipped cream.

Add the softened ice cream and return to the freezer for a few minutes. Then repeat the steps with more whipped cream, cookies and then ice cream until you nearly fill the pan. Finish with whipped cream, sprinkle the top with chopped chocolate or candy bars. Cover with plastic wrap and freeze until firm.

When you are ready, remove the plastic wrap and while holding the paper overhang, pull the ice cream cake out of the pan and place on a serving plate. Discard the paper and complete your decorating by personalizing the cake with writing gel. Instead of using the typical greeting, think about being very creative by adding a message, brief poem or clever saying.

It only takes about 15 minutes to assemble the cake and about an hour or so to chill it completely. The cake will be the exact size and flavors that you love and will please everyone. This is just a basic concept for a unique cake. Feel free to improvise and create something special for your family and friends.

Homemade Ice Cream Cake

"Are you sure you don't want me to pick up a cake at the ice cream store?" I ask my twenty-five-year-old son on the phone. He whines like a three year old. "You try to talk me out of it every year, Mom. I want you to make me an ice cream cake for my birthday. I want a mint chocolate chip ice cream cake. I've told all the guys in the band how great it is. C'mon Mom!"

He's told all his friends. I thought he was over having birthday parties with his friends when he was ten, but apparently not.

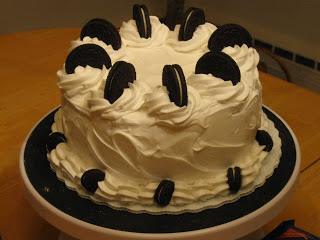
In this day and age, it just seems wrong to make a homemade ice cream cake. There are beautifully decorated cakes in the freezer section of the grocery store, not to mention in the local ice cream parlor. I realize that making his ice cream birthday cake is more about reliving his childhood (I've made him ice cream cakes since he was two years old), and I recall baking and freezing a volcano ice cream cake that his friends talked about for years. He was so proud of that cake. (Not of his mom; of the cake.)

"How many friends are coming, Jake?" I ask him, knowing full well that he is going to tell me something like I don't know, Mom. Can you make enough for twenty?

It was easy to make a cake for twenty little freckled faced boys with twenty pairs of dirt-riddled sneakers in the house when he was a kid. It was no problem dealing with the twenty little hands that hide twenty little boogers under the coffee table top instead of using a Kleenex. Twenty little gift bags full of plastic spiders and Jolly Ranchers. And twenty gifts that made Jake so excited that he had to run to the bathroom every fifteen minutes. Ahhh, those were the days.

A cake for twenty nowadays means two cakes in the freezer. This entails my husband taking out all the Lean Cuisines, frozen oat bread, pork chops, and something grey and hairy, and trying to stuff them into the extra fridge in the out building. (You know the extra fridge... It's called the Extra Fridge because it costs an extra thirty bucks a month on the electric bill so he can store two six-packs of grocery store brand diet soda, an empty bottle of mustard, and two half-bottles of ketchup).

We take everything out of the freezer to fit the humungous birthday cakes for Jake. His birthday party is in the evening, so this requires appetizers as well. I pick up ten pounds of Buffalo wings for the band, and another five for the regular folk. My husband goes to Costco and purveys massive amounts of chips and soda. He also comes home with a five CD audio set of John Denver. "It's for Jake." I see through his bald faced lie. "Jake doesn't like John Denver." He smiles and takes the shrink wrap off the CD's. "He doesn't? Well I guess I'll have to listen to them, then. I just hate waste." (Guess he forgot about the Extra Fridge.)

So the cake is ready, the appetizers are in place, the soda is chilling, and there are piles and piles of chips and salsa on the table. The family begins to arrive and mill around while John Denver plays in the background.

Then we hear the tell-tale backfire. We look out the window and watch as the primer-gray serial killer van pulls up. With a little banging and coaxing, the van's side door opens and out tumbles Jake. (The driver door hasn't worked since the Great Wal*Mart Parking Lot Incident of '06.) Then the real show as the van begins to mime the capacity of a clown car; band member after band member emerges with some kind of instrument in hand. The van just doesn't look big enough to hold them all. Yes, Jake is right. There are twenty of them, and they are all heading toward the door. (Except the one who stops by my maple tree and begins to "water" it. He must be the drummer.)

Twenty pairs of dirty Converse sneakers, twenty spiked up, multi-colored hair-dos (or hair-don'ts... depending on how you look at it, I guess...), and twenty outlandish outfits that I think their sisters should be wearing. I have to blink because at that moment I see Jake and his friends as ten-year-olds again. It just happens that these ten year olds eat gobs more and are a lot louder.

"Hey Mrs. M," shouts Jake's lifelong friend, Sam. "Did you make one of your awesome ice cream cakes?"
"No, Sam, I made two."
"Right on," he casually replies as he beelines past me for the ranch dip and the Fritos.

By night's end, the house has transformed into a waste site filled with dip-smeared paper plates, empty chip bags, and enough aluminum soda cans to build a Toyota. There are also smashed chips in the carpet, and droopy Mohawks on these future captains of industry. I also find it amusing to see the boys listening to John Denver with Jake's Dad. Jake actually looks interested in what my husband is saying. I think they actually like John Denver.

The band isn't so bad; they sing and play a punk-reggae-fusion version of Happy Birthday for Jake. And as the party wound down, Jake came over to me and gave me a big hug. "Thanks Mom for making my cake. And thanks for letting the band come, too. You're a great Mom."

It was all worth it until next year.

Ice Cream Cake Recipe

2 boxes of cake mix (any flavor)

2 to 3 containers of Cool Whip

1 gallon of ice cream in a rectangle box (any flavor)

2 to 3 cans of frosting (any flavor)

Make the cakes as directed on the box, use two 9 x 12 pans to bake the cakes. Let the cakes cool. Put one of the cakes on a covered with foil cookie sheet. Open up the ice cream box completely so that you have a brick of ice cream and slice the brick into 6 even slices. On the top of the first cake, lay each ice cream slice on top of the cake, side by side so that it covers the whole top of the cake and pinch each slice into the next so you have a solid layer of ice cream. Next, take a half of a can of frosting and spread it over the ice cream evenly. Try to do the frosting quickly because the ice cream will begin to melt. Next, use one of your Cool Whips and spread half the container on top of the frosting and spread evenly. Now take your second cake, and lay it over the top of the ice cream/frosting/Cool Whip layer. Cover in saran wrap and stick it in the freezer for an hour.

After freezing for an hour take the cake out and completely frost the whole cake. After frosting the cake, put a whole nice thick layer of Cool Whip over the frosting as if the Cool Whip is the frosting. Then put back in the freezer for eight hours.

When you serve, pull cake out of freezer about 15 minutes before slicing.

This cake will serve 12-24 people depending on how you slice the pieces, or how big the band is!

Classic Pancake and Oreo Ice Cream Cake Recipes

Classic Pancakes

Ingredients:

2 cups flour

1 tsp salt

1tbsp sugar

2 tsp baking powder

2 eggs

1 tsp vanilla extract

1 tbsp melted butter

2 cups milk

Directions:

Sift together the flour, salt, sugar, and baking powder. Add eggs, vanilla extract, and melted butter into the bowl that has the dry ingredients. Now blend that together while gradually adding all the milk into the mixture. Fry on a lightly oiled pan. The size of the pancake can be any size but should be about 1 - 1 ½ cm thick. Flip the pancakes when the edges are dry and the top is bubbling.

Oreo Ice Cream Cake


1 ½ cups Oreo cookie crumbs

1/3 cup melted butter

1/3 cup sugar

1 ½ cups semi-sweet chocolate chips

½ cup whipping cream

4 cups vanilla ice cream

½ cup melted semi-sweet chocolate

1 cup whipped cream

First mix the Oreo cookie crumbs, melted butter, and sugar in a bowl until blended. Now press the mixture onto the bottom of a 9 inch wide - 1 to 3 inch high pan . Now put the 1 ½ cups semi-sweet chocolate chips onto the Oreo crust. Bake at 350 degrees for 7 minutes. Remove pan and let cool in freezer. Once cool, put ice cream inside. Now, on the stove heat up the whipping cream at medium heat and mix the ½ cup chocolate into it. Once it is smooth, Pour it on top of the ice cream. Decorate the top of the cake with some whip cream and put it in the freezer. Serve frozen.

Ice Cream Cake Recipe - Cooling Off With Homemade Ice Cream Cake!

When the temperature is well pass 100 degrees, and your kids are sitting around complaining about the heat that is the best time to breakout the ice cream cake recipe. It is the cake recipe that keeps on giving. It will satisfy any sweet tooth while cooling down your body temperature. Your kids will not care which flavor combination you use, they will just be happy to have their cake and ice cream.

Making an ice cream cake sounds complicated, but it can be very easy to follow. The main ingredients are ice cream, cake batter, frosting and the toppings of your choice. You can use any flavor combination you choose, making your combination choices endless. As for utensils, you will need to make sure you have two cake pans, plastic wrap and foil.

Before you get started, you will need to put one of the cake pans in the freezer to chill. Once the cake pan has chilled you will want to line the pan with plastic wrap. This will keep the ice cream from sticking. Spread the frozen cream evenly in the chilled cake pan. You will want to make sure you cover any air holes. Once that is complete, cover the pan with foil and place back in freezer.

Following the instructions on the outside of cake box, mix the cake batter. Place the mixed cake batter in the second cake pan. To keep the cake from sticking, do not forget to oil and flour the second cake pan. After the cake has finished cooking, leave it out to cool.

Once the cake has thoroughly cooled, you will be able to continue with your frozen cream cake recipe. Take the chilled cake pan from the freezer, and place it on a freeze proof platter, then place the cake on top of the ice cream. Once both cakes are aligned, you can start decorating the cake anyway you see fit. About this time, your kids will be begging for a piece. Once everyone has had a slice make sure to place the cake back in the freezer otherwise you will have a mess on your hands.

How to Make a Fantastic Ice Cream Cake For Your Child's Birthday

Ice cream cakes are expensive, yet they taste great and are a wonderful way to celebrate a birthday especially for a young child. It today's economy it's important to make sure every penny is accounted for, so are these store bought cakes worth it? The answer, if you already have some basic cake making equipment, is no.

The cake is just as easy to make as any other, and a even a bit simpler than many others that I've made. You can picj up all the ingredients for much cheaper than what you'd pay for a full cake and if you make it yourself you can have it exactly as you'd want it, from extra ingredients to size and even personalized frosting.

First of all you'll need two same diameter cake tins, 9 inch ones work well. Get your ice cream out and leave it to soften. You do not want it to melt and a microwave is too powerful to control the melting rate. If you let it melt too much then all of the air will come out of the churned dessert, you'll be left with an unappetizing mess.

Once it's started to soften fill up your tin that you've lined with plastic. Push the mixture into all of the corners and add to it layer by layer until it is full. Cover with more plastic, then tinfoil and put back into the freezer. Let it refreeze for at least a couple of hours.

Now you can make a sponge base or whatever else you'd like to be included with the cake. If you do, let it cool, invert the ice cream take away all the packaging and put it on top. Stack one on top of the other, wrap everything in plastic again and put it back into the freezer. Leave everything you've added for at least 3 hours, remove and take away all of the plastic. Frost just like any other cake than serve, eat and enjoy!

Tips on How to Make an Ice Cream Cake

You don't have to visit your local bakery, grocery store, or even specialty ice cream store to get the perfect ice cream cake for your party. Depending on the type of event you're hosting, you can design your own homemade ice cream cake that will be tastier, more fun, and less expensive than anything you can pick out of a retail freezer. Here's how you can make an ice cream cake.

What you'll need...

Cake pan/mold (get one that reflects the theme)

Plastic wrap

Three gallons of ice cream (mix and match your favorites)

Ice cream scoop

Bowl of warm water

Store bought frosting, optional

Fruit or candies for decoration

Cake plate

Let's say you're making it for a baby shower or infant's birthday. You can get a cake mold in the shape of a teddy bear, rocking horse, baby, building blocks, whatever you can find at the store.

Take the cake pan and spread a very large piece of plastic wrap down on the inside of the mold. Press the plastic wrap into the design.

Allow ice cream to soften to room temperature before working with it. Take the first flavor (we'll say strawberry) and scoop it into the mold until it's completely full. Smooth out the ice cream. Then, dip the scoop into the warm water and remove the inner parts of the ice cream, leaving only a shell around the edges. Return unused ice cream to the container. Place first layer of ice cr eam in the freezer for forty-five minutes.

Remove mold and add your second flavor (we'll say chocolate.) Do the same with the second flavor as the first. Once the mold is full, remove the inner portion and return it to the carton, leaving a second shell of chocolate inside the strawberry. Return mold to freezer for another forty-five minutes.

Repeat steps with third flavor (we'll say vanilla), only fill the entire middle with the remaining flavor. Then let the mold stay in the freezer for two to three hours to get good and solid.

Before you're ready to serve, remove the mold from the freezer. Using the loose ends of the plastic wrap, lift it from the mold. This should come out easily. Flip the mold onto a cold cake plate. At this point, you can frost the cake with a store bought frosting or just leave it as it is. You can also spruce it up with candies, cherries, peppermints, drizzles of caramel, chocolate, or strawberry, or any of your other favorite toppings.

Serve immediately by slicing with a sharp knife dipped in warm water. Your guests will wonder how in the world you managed to make this. They'll think you're a culinary genius. You'll never tell just how easy it was. So whether you are making the cake for a party, like a baby shower or birthday, or just for fun, just follow the simple steps above for a special treat that everyone will love.

How to Make an Ice Cream Cake

Ice cream and cake have long been the staples of birthdays, weddings, graduations and many other types of celebrations. It's little wonder some culinary genius decided to combine them. Most of the time, ice cream is a delicious dessert all by itself. But if you've ever had an ice cream cake then I'm sure you'll agree that it's a taste treat that you'll want to have for every party and celebration. Filling delicious ice cream between layers of flaky, moist cake allowing the two to melt together is a flavor explosion so good it is sinful.

It would seem that this wonderful combination of two cherished desserts could only be experienced at a restaurant or bought from an ice cream shop or grocery store. Purchasing an ice cream cake can be quite expensive, usually more than a regular cake. But in reality it isn't that difficult to make a custom ice cream cake right at home and it's much cheaper. In fact it's a lot of fun to do. And once you get good at it you'll probably look for every opportunity there is to make great ice cream cake for your friends and family.

Start with a quart to a quart and half of your favorite flavor of ice cream. The biggest trick to making an ice cream cake at home is to get the ice cream to just the right level of softness. You'll want it soft enough to mold but not to the point that it is getting melted and runny. So don't just leave it out for an hour and forget about it. Somewhere around 20-30 minutes should do it. In fact, try setting a timer so you can record the perfect amount of softening time for the next ice cream cake you make. Make it part of your own personal recipe. When you bake your cake, use only about half of the batter. Rather than throwing it out, use the other half to make cupcakes. Follow the directions on the box and remove the cake from the pan and allow it to cool. It should be completely cool before proceeding.

Once you have the ice cream at the right level of softness you'll need to make the cake using a simple layering technique. Use a deep round cake pan or you can experiment with other sizes and shapes once you are comfortable making the cakes. Bring out your cake and cut it into slabs about an inch thick. Start with a layer of cake on the bottom and then make a layer of ice cream about the same thickness. If the ice cream is at the right softness, you should be able to cut and mold it easily. Continue adding layers of ice cream and cake until the cake pan is full. At this point you'll want to work very quickly to avoid letting the ice cream melt too much. Always use a layer of cake at the top so you can frost it or use sundae topping or fruit or whatever topping you like. Now cover the ice cream cake with plastic wrap and put back in the freezer for at least three hours. Once it is frozen, take it out and slice it as you would a regular cake. Now you have an ice cream cake just as good as in any restaurant and for half the price.

What Are the Different Types of Ice Cream Cake?

During summer, everyone enjoys a cold drink or a frozen dessert. You can easily beat the heat of the sun by having a refreshing snack. If you are crazy about cakes and ice cream, you should try making a sweet treat by combining the two food items. You can make an ice cream cake that comes with a rich taste and an exciting look. This fabulous treat has several variations; you can add in slices of fruits as topping or as part of the mixture. If you love chocolates, you can also put chocolate chips or syrup to blend in the batter. Simply use your creativity so you can come up with a great cake.

Chocolate cake is a classic favorite, and you can come up with a frozen treat using your favorite brand of chocolate. However, you might want to try something different to put a variation in the usual dessert you eat. If you like to discover great new ways to make ice cream cake, read along to find out about the several types of this cool and refreshing cake with ice cream.

1. Peanut Butter Ice Cream Cake
If you are crazy about peanut butter, you might want to try using it in the cake recipe. Simply add in about half a cup of peanut butter to the mixture. You can use whichever type of peanut butter for this recipe (chunky, creamy or crunchy). However, I suggest you use chunky peanut butter so it will go well with some chopped peanuts in the mixture. As for the rest of the cake, you may use crushed graham cracker to match the overall brown color of the cake. Garnish the top of the cake with chopped salted peanuts or walnuts.

2. Brownie Chilled Cake
This recipe is quite easy to make. You may decide to bake a batch of brownies, or buy about a dozen of your favorite brownies. Then, line them up in a cookie sheet, until the brownies has filled all the spaces in the sheet. Chill the brownies for about 30 minutes. Afterwards, top the brownies with raspberry sorbet mixed with a good quality vanilla ice cream. Serve with slices of fresh raspberries on top.

3. Cranberry and Pistachio

The fabulous mix of color of this ice cream cake recipe will surely be a feast to the eyes. The green pistachios and red cranberries make this recipe perfect for a Christmas dessert. You may opt to use fresh or frozen cranberries for the recipe. As for the pistachios, chop them into small pieces to create a crunchy appeal to the cake. Then, use vanilla ice cream to combine with crushed saltines or crackers. Garnish the top portion of the cake with a few chopped pistachios and some cranberries.

These recipes are truly fabulous because of their excellent taste and enticing look. Moreover, the ingredients used in each recipe are very nutritious; thus, these treats are definitely good for your health. Try making these great ice cream cake recipes that the whole family will love.

Recipe For Homemade Ice Cream

Homemade ice cream has not lost any of its good, old-fashioned appeal. There are delicious homemade ice cream to meet every need: regular, low calorie, sugar free and non-dairy. And anyone can make a homemade ice cream to suit their need.

Below are 5 delicious ice cream recipes you can prepare at home:

1. Blueberry Ice Cream

Ingredients:

- 2 pints blueberries
- 1 1/2 cups sugar
- 3 tablespoons orange juice
- 4 cups light cream
- 1 teaspoon vanilla extract

Directions:

- In a 3-quart saucepan combines blueberries, sugar and orange juice.
-Mash berries slightly and cook over medium heat, stirring occasionally, until the mixture comes to a boil.
- Simmer 5 minutes.
- Remove from heat and puree in a food processor or blender.
- Push mixture through a strainer with the back of a wooden spoon.
- Cool the mixture.
- In the chilled canister of ice-cream maker combine blueberry mixture, cream and vanilla. Freeze according to manufacturer's directions.

2. Blueberry Ice Cream version 2

Ingredients:

- 3 cups blueberries
- 3 cups table cream
- 1 1/4 cups sugar

Directions:

- Blend in blender just before putting in machine.
- Simple recipe, great ice cream.
- Nice texture, nice flavor (not too sweet).

3. Brown Sugar Pecan

Ingredients:

- 1 cup milk
- 1 scant packed cup brown sugar
- 4 egg yolks
- 3 cups heavy cream
- 1 cup pecan pieces

Directions:

- Heat the cream milk and sugar in a heavy-bottomed saucepan, stirring occasionally until the sugar is dissolved and the mixture is hot.
- Place the egg yolks in a bowl and whisk briefly.
- Still whisking, slowly pour in about 1 cup of the hot liquid.
- When the mixture is blended, slowly pour it into the liquid in the saucepan, whisking constantly.
- Cook over heat, stirring constantly until the mixture thickens slightly and coats the back of a spoon, about 8 minutes.
- Be sure not let the mixture boil at any time or will curdle. strain into a clean bowl and cool thoroughly. Stir in the nuts.
- Pour the mixture into the bowl of the machine and freeze.

Makes 5 cups.

4. Burnt Caramel

Ingredients:

- (Yields: 1 Quart or 950 ml)
- 1 C (190 g) granulated sugar
- 1 C (240 ml) HOT water
- 4 eggs
- 1/2 C (40g) powdered sugar
- 2 C (450 ml) heavy cream
- 1 tsp vanilla extract

Directions:

- Heat granulated sugar and 1/4 C (60 ml) of the water in a large skillet on medium high heat until the sugar melts and boils, stirring occasionally.
- Boil until mixture is a dark brown; remove from heat.
- Gradually stir in remaining 3/4 C (180 ml) water. (I love this part, cause the syrup boils up when the hot water is added) Cool to room temperature and set aside.
- Beat eggs in a medium bowl until thick and lemon colored; gradually beat in powdered sugar.
- Stir in cream and vanilla; stir in the caramel mixture.
- Chill. Freeze in an ice cream machine according to manufacturer's directions.

5. Butter Pecan

Ingredients:

- 2 cups light cream
- 1 cup brown sugar
- 2 tablespoons butter
- 2 cups heavy cream
- 1 teaspoon vanilla extract
- 1/2 cup toasted chopped pecans

Directions:

- Combine the light cream, sugar, and butter in a medium saucepan.
- Cook, stirring constantly over low heat until bubbles form around the edges of the pan.
- Let the mixture cool and put it in the ice cream machine.
- Stir in heavy cream and vanilla.
- Freeze as directed by your machine's manufacturer.
- Add pecan after ice cream begins to harden.

3 Chocolate Ice Cream Recipes

Make good use of your ice cream machine! The following recipes are for chocolate and chocolate blends only.

Recipe #1 - CHOCOLATE ICE CREAM

4 egg yolks, lightly beaten

1 cup sugar

2 cups table cream (18% milk fat)

1 1/2 cups milk

1/2 cup cocoa powder (sifted)

2 tsp pure vanilla extract

Beat egg yolks lightly. Beat in sugar. Heat the cream/milk on the stove. As it's heating, beat in cocoa powder. Heat cream/milk/cocoa mix until steaming. Stir into egg/sugar mix. Add vanilla extract. Cool. Freeze in ice cream maker.

Recipe #2 - CHOCOLATE BANANA

3 eggs

1 cup sugar

2 oz bittersweet chocolate

2 cups table cream (18% milkfat)

1 1/2 cups milk

6 tablespoons cocoa powder

1 tablespoon vanilla extract

3 over-ripe bananas

Juice of 1 lemon

Beat eggs lightly. Beat sugar in to eggs. Melt chocolate in milk and cream. When chocolate partially melted, stir in cocoa powder.
Continue stirring chocolate/cream mixture until hot but not quite boiling. Stir hot chocolate/cream mixture in to eggs. Stir in vanilla extract. Cool.

When ready to make, mash bananas and lemon juice together
Make chocolate mixture in ice cream maker. Just before ready, add banana mixture.

Note: Use good quality, *very* ripe bananas. Otherwise your ice cream will have a strange flavor.

Recipe #3 - CHOCOLATE CHIP COOKIE DOUGH

2 c Milk

1 3/4 c Sugar

1/2 ts Salt

2 c Half & Half

1 tb Vanilla Extract

4 c Whipping Cream

Pillsbury Chocolate Chip - Cookie Dough (large size) - OR homemade cookie dough

Take the chocolate cookie dough out of fridge and leave out till needed. Scald milk until bubbles form around edge. Remove from heat. Add sugar and salt. Stir until dissolved. Stir in half and half, vanilla, and whipping cream. Cover and refrigerate 30 minutes. Freeze as directed by your ice cream machine's instructions.

Once ice cream has been through the entire ice cream machine process and is now a chilled soft ice cream, add the chocolate chip cookie dough. Just break up the dough as best you can with your hands and drop it in small clusters into the soft ice cream. Try to mix it around to ensure that the cookie dough is evenly distributed throughout the ice cream. Put the ice cream in the freezer for several hours until hardened.

Homemade Ice Cream - Simple Strawberry

As a child growing up in a rural village one of the pleasures of the summer was picking strawberries. When June arrived I, along with all the other children, waited excitedly for the giant signs to go up in the farmer's fields advertising that pick your own strawberry season was here again. As soon as the signs went up, mums and dads were nagged and nagged until we were eventually allowed to go, and the fields were soon filled with families carrying assorted boxes, cartons and baskets which were soon filled with luscious, plump, scarlet strawberries.

When I moved to France one of the first things I planted in my vegetable garden was two rows of strawberry plants. I felt like a child again, waiting for the plants to grow and provide me with a bumper crop of fruit. What I didn't anticipate was how many strawberries two rows of plants provide and I was soon overwhelmed with mountains, well small mountains if I am to be totally truthful, but still far too many for me to eat.

The problem with strawberries, the only problem that I can see as I absolutely love them, is that they arrive at the hottest time of the year. I love making jam, and make quite a lot of it, but the thought of spending hours in the kitchen making jam during the hottest weeks of the year filled me with dread. Fortunately strawberries make fantastic ice cream and so turning to my trusty Ice Cream Maker I set about making strawberry ice cream in the simplest and quickest way I could possibly think of.

Below is my homemade ice cream recipe for strawberry ice cream. It is very simple and easy to make, and tastes delicious especially on a hot summers evening with a chilled glass of local french wine.

Homemade Strawberry Ice Cream

450g Strawberries

75g Sugar

450g Double Cream

50ml Water

First of all hull and chop your strawberries in to small pieces, I tend to chop larger strawberries in to six and smaller strawberries in to four. Place to one side.

Place the sugar and the water in to a pan to make a sugar syrup. Heat until the sugar has dissolved and then simmer for a few minutes. Pour the syrup and th strawberries in to a food processor and blend until you have a puree.

Add the puree to the cream and churn in your Ice Cream Maker.

Homemade Ice Cream Recipes

Naturally with homemade ice cream recipes you do need an ice cream making machine which can vary in price from around $30.00 and upwards. At these prices it can be well worth making your own ice cream and not just for those special occasions.

The great thing about homemade ice cream recipes is that you can put whatever ingredients you fancy in them. You can also make them to suit everyone's taste like sugar free, low calorie, non-dairy or even the great creamy regular ice cream.

You can use all kinds of fruit for the ingredients, apples, pears, apricots, plums, berries of all sorts, bananas, kiwi fruit, lemons, oranges and the list goes on. Somewhere there will be an ingredient to suit almost anyone's taste even if it is exotic.

Here's a tidbit that you may not have known, ice cream was said to have been invented by a French Chef of King Charles the 1st who apparently dished it up as a dessert after a sumptuous state banquet.

King Charles has even been alleged to have paid his chef a princely sum so that he did not share the ingredients of his delightful dish to anyone but instead keep it for the royal personage only. Naturally like all best kept secrets they get out in the end.

To this day it is not known whether Ice Cream was invented or came about naturally because even in the roman era it was known that something similar to ice cream was also around in the time of the Emperor Nero Claudius Caesar. It has been said that he sent slaves to the mountains to bring back ice and snow to cool or freeze the fruit drinks that he was said to be fond of.

One can even imagine times before that when water was frozen over that people would mix some kind of fruit with snow or ice to take as a substitute for frozen water or even to give it some taste. After all this is how wine and beer came about.

What we can be sure of is that ice cream in one form or another is around to stay and we should make the most of it. Ice cream is the delicious treat that finishes off a great meal, party or that very special occasion for nearly everyone.

In the extremely hot weather it is great for that cooling refreshing sensation that it gives you as you enjoy it in the heat of the day or night. To have it everyday would be an indulgence that may be a bit too much for most of us but as there are a great variety of recipes it is now nearly possible to get ice cream that is almost good enough to eat daily.

For the health conscious amongst us it is still only for the occasional treat, but what a treat! If you fancy getting around to making your own homemade ice cream recipes but you don't have a clue on how or where to start then you may wish to try the link in my bio.

Happy Homemade Ice cream recipes!

Easy Peezy Ice Cream Recipe

Many people do not own an ice cream maker, but would like to know how to make home made ice cream. This simple recipe will show you how. Be warned it takes several hours to make, but the end result is well worth it.

Ingredients:

1 cup caster sugar

1 cup water

1 cup double cream

What ever you wish to put in the mixture.

Examples: 1 Cup melted chocolate (for chocolate ice cream)

1 Cup Strawberries/raspberries etc

If you want to make a vanilla ice cream just had a few drops of vanilla essence or some vanilla pods etc.

Basically you can put any flavour you wish into the mixture, try experimenting. I make a chocolate and peanut butter ice cream using this recipe.

Instructions:

1. Mix the water and sugar in a saucepan. Heat until the water is boiling and all of the sugar is dissolved.

2. When the sugar has dissolved add the cream and the rest of the ingredients. Stir constantly throughout to prevent the mixture from burning.

3. Bring to the boil again.

4. When mixture is boiling, reduce the heat and simmer until the mixture has reduced a little.

5. Once reduced take the mixture off the heat and pour into a container and let the mixture cool stirring repeatedly until mixture has thickened up.

6. Place container into your freezer (if you have an ice cream maker, put the mixture into the maker now).

7. Every half an hour take the mixture out of the freezer and stir it thoroughly.

8. Repeat step 7. until the mixture has frozen to chosen consistency.

9. Eat you ice cream.

Top 7 Ice Cream Sandwich Recipes

There aren't many people out there who don't like a good frozen dessert. Whether it is ice cream, frozen yogurt or sherbet, recipes abound to help tantalise your taste buds and answer your cravings for something ice cold and sweet. Nothing is better than a list of top recipes to help you create the frozen sweet you want. If you like your sandwiches sweet and frozen, here are a few recipes to keep you happy.

1. There is nothing like a traditional vanilla frozen sandwich. Assembling it with a brownie crust makes it highly delectable. Just remember, it doesn't have to be plain to be delicious. Use the finest ingredients for a truly great ice cream sandwich.

2. A close second to the vanilla sandwich is the good Dutch chocolate sandwich made with your choice of crust. You can go with the standard devil's food or brownies or perhaps go for a vanilla or peanut butter flavoured crust to take it to the next level.

3. If you'd like to try something a little different, you might want to go for a lemon filled sandwich with a blueberry swirl. Encase the frozen goodness with a blonde brownie recipe for a really enjoyable treat. Lemon zest makes a tasty extra that goes so well with the blueberries.

4. If you're looking for that perfect chocolate and banana combination with a little extra, check out a chocolate chip and banana sandwich recipe. Making the filling using well ripened bananas with a delicious chocolate chip cookie crust is what makes this treat worth your while.

5. When trying out new recipes, you can't go wrong with the Sicilian. Made with a brioche crust known for its buttery goodness, use hazelnut or pistachio gelato along with delicious bittersweet chocolate chunks to make a sandwich worthy of its Italian heritage.

6. If you decide to go for something on the culinary cutting edge, a gingersnap crust with a tart lemon filling might just be what you're looking for. Make the lemon flavoured filling from scratch with whole milk and fresh ingredients for the best result. Make your gingersnaps from scratch too for the freshest tasting crust.

7. Top your list of favourites with a truly wonderful and fresh Almond Florentine crust with a black raspberry chip filling. Chocolate coated florentines are what gives this recipe that special classic raspberry/chocolate combination.

As you can see, ice cream sandwich recipes abound in the dessert world. You're really only limited by your own imagination. If you can think of a combination, it surely can be made. Keep that in mind the next time you're in the mood for a delicious ice cream sandwich, and your options will be endless.